Tag Archives: homemade

Scriptural Reasons for Having a Hope Chest

30 May

This is Part 4 of the Hope Chest Series. If you missed the Hope Chest Series Introduction, or Part 1: “What’s in my Hope Chest?” ; Part 2: “What am I adding to my Hope Chest?”  or Part 3: “What Does Having a Hope Chest Mean $$-Wise?” you can find them here, here, here, and here.
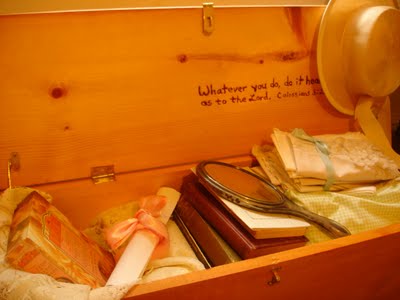
"Whatever you do, do it heartily, as to the Lord and not to men." Colossians 3:23

 There’s No Commandment:

Of course, if you are any at all familiar with the Bible, you know that there’s no commandment declaring, “Thou shalt have a hope chest!”

Yet, if you look at the different Biblical principles for young women, having a hope chest is a reasonable, fun, and awesome project to make these principles REAL in our lives!

Having Hope for the Future:

As discussed in our Hope Series Introduction, having a hope chest is not about how many items you can accumulate over time, but about the hope of a future, a good God-based future.The Lord desires that we follow His plan, for He has the plans of hope and a future.

Jeremiah 29:11 says, “‘For I know the plans I have for you,’ declares the LORD, ‘plans to prosper you and not to harm you, plans to give you hope and a future.'” (NIV)

Having Patience:

James 5:8 tells us to “Be ye also patient; stablish your hearts: for the coming of the Lord draweth nigh.” (KJV)

When creating a hope chest, patience is definitely required, whether you are waiting patiently for the day you may open your hope chest for use or are patiently creating (or buying) your items! As you practice this patience, your heart will become established in this project. You will learn to apply your patience and devotion to not just waiting for the future, but for the coming of the Lord! He is our groomsmen (even if you were planning on never marrying, as I was), and we must patiently wait, with our heart established in Him!

Being a Proverbs 31 Woman:

Whether or not you marry, you have to admit, this Proverbs 31 woman is kind of, like…yea, perfect! And I am sure that allll Christian women everyone desire to be as godly and well-rounded as she, (and sometimes are, and sometimes are not).

If you notice her adeptness in skill! She “works with eager hands,” verse 13 says in the NIV Bible.  And The Message says of her, “First thing in the morning, she dresses for work, rolls up her sleeves, eager to get started.” She knits, sews, cooks, gardens, and “skilled in the crafts of home and hearth.” Seriously–she has so much talent and skill! Not to mention she loves the Lord.

Having a hope chest prepares us with the same skills. As we make our own quilts and pillows, lay aside recipes of delightful tastes, include devotionals and Bibles and memories to pass on to the next generation, we gradually become this Proverbs 31 woman in our own unique way. How very special!

In Your Youth, Be An Example:

Finally, while we are young, we can be a shining light for the Lord! And what a great way to share the love of Christ than by having a hope chest. All the items are set aside in love, in patience, in hope, and in the faith in Christ for His plans of a future, which can be passed down and passed down and passed down.

(Either to your own children or, if you choose not to marry and/or have children, to other’s children.)

1 Timothy 4:12 says “Let no man despise thy youth; but be thou an example of the believers in word, in conversation, in charity, in spirit, in faith, in purity.”

Of course:

There are many other Scriptural reasons why having a Hope Chest is such a delightful idea/project, but the above are all I am sharing–for now.

Do you have a reason in addition to these? Leave a comment if you like! I would love to hear it.

This concludes our 4-Part Hope Chest Series! Again, if you missed the other articles, their links are provided above. And if you enjoyed this series, I am very glad!

What Does Having a Hope Chest Mean $$-Wise?

28 May

This is Part 3 of the Hope Chest Series. If you missed the Hope Chest Series Introduction, or Part 1: “What’s in my Hope Chest?” or Part 2, “What am I adding to my Hope Chest?” you can find them here, here, and here.

Having a Hope Chest is like having a saving account for your marriage or future life.

 Hope Chest = Savings Account

Like the picture of the piggy bank above with the two wedding bands, a hope chest is a “cedar bank,” if you will, with the supplies you need to bring to a marriage or to a life on your own. Savings Accounts accumulate over time, as will your hope chest, and when the time comes, you can withdraw from it. With a savings account, you gradually put more money into it, and normally the deposits are painless. When you are able to withdraw from that savings account, however–there is no pain whatsoever in seeing the fruits of your additions. With a hope chest, you are saving for the future, though (often) not in monetary terms, and all the hope and joy is great, indeed!

How is Having a Hope Chest a Frugal Decision?

As discussed in the previous paragraph, a hope chest is gradually added to. Normally, people buy items while they are cheaper, on sale, or make the items themselves. Also, since most hope chest collections are added to by teenagers–parents are involved, Christmas is involved, and birthdays are involved! Although the items are only added a little at a time, the price of the items ultimately adds up to where if you had to buy all the items at once, it would definitely be a burden against your bank account. Little by little is the way to go, whether your items are homemade or whether your parents buy the items, or whether you do–overall, the decision to have a hope chest is a frugal one!

Think of the Joys Later…

After accumulating these items over time, and not hurting your budget or band account, the time FINALLY comes when you get married or live on your own. The joy that comes from looking at this grand accomplishment of SAVING items (and ultimately money) and using these items, without having to strain yourself to buy the necessary items, is, I can imagine, quite great–not to mention the items that you make yourself. (Talk about a boost of self-esteem!)

Knowing you will not have to spend a lot of money on the things, such as silverware, dishware, and cooking utensils, bed sheets, blankets, pillows, towels, wash rags, etc, which can be quite expensive when bought all together (and without all the great sales), is enough to celebrate! Yay!

Do I Recommend Having a Hope Chest?

You bet I do!! 🙂 Would you?

NEXT: The final article to the Hope Chest Series (for now), Part 4: “Scriptural Reasons for Having a Hope Chest.”

What Am I Adding to My Hope Chest?

27 May

This is Part 2 of the Hope Chest Series. If you missed the Hope Chest Series Introduction and/or Part 1: “What’s in My Hope Chest?”, you can read them here and here!

Unfortunately, these lovely china plates are not mine, they're just a picture off of Google Images!

The Need to “Build Up”:

After seeing the pitiful amount of items–and the even more pitiful variety of functions of these items, (since most are for decorating only)–in my hope chest, you see my desperate need to “build up,” or “stock up” on items that can be useful for everyday use. (More along the lines of pillows, quilts, and the like…)

What I Plan to Include in My Hope Chest:

Hopefully I can get most of these things this summer, but if not…that’s cool, too. I actually have not spent more than $10 on all the things in my hope chest because almost everything was given to me. (Yay!) 🙂 If I do end up buying most of these items I have listed below, I will not pay full price for them (unless I have to), haha! (But that’s another subject and another post, which you will find in Part 3: “What Does Having a Hope Chest Mean $$-Wise?”)

Once these items are added, I will try to link them to a post giving the hows, whens, wheres, and whats of that item. 🙂

So this is my list, but remember you can add ANYTHING you want

Books

:: Family Bible:: I may have to buy this one full-price, since most family Bibles you find at garage sales and such are already marked in.

:: My Favorite Books:: Just to let others borrow and read, and for me to read for the millionth time, too.

:: My Senior Year Book (High School/College):: My high school senior year was so special! I met amazing people, gave up a full-ride scholarship to an Ivy League, moved all the way across the United States (from Texas to the Northwest) in January of that year, and enrolled in a community college (which so many people did NOT expect of me).

:: Baby Memory Books:: I thought I might get five, one for each of my four sisters and my one brother (for their first child). Who knows, though? If I do get married, I may have to use them for my children (or at least some of them)!

:: Recipe Books:: I have not totally made up my mind on this one, as I may just find certain recipes and place them in a book/binder. Books are bulky!

:: My Favorite Devotional Books:: I also may make my own devotional, comprised of all my favorite single devotions, instead of getting just books…

:: Scrapbooks:: This one has 2-parts. The first are my picture scrapbooks. The second is a number of scrapbooks with me making certain homemade products and sewing certain things, like a “picture-how-to” book. When I make my first one, I will show y’all how it turned out and exactly what I mean by this!

Bedroom Items

:: Pillows/Pillow Cases:: I am thinking maybe three pillows and at least ten pillow cases. I am thinking of neutral-colored pillow cases, so they will match anything.

:: Blankets/Sheets/Quilts:: Not sure if I am going to make a homemade quilt–seems kind of difficult! (But I will try.) Once again, neutral-colored blankets/sheets, and I will make these (mostly). Maybe 3-5 sets.

:: Hangers:: These are everywhere, so I should have no problem finding them for cheap (or free)!

Bathroom Items

:: Towels/Wash Cloths:: A couple of fun colors like lime green and blue, but then also neutral-colored ones.

:: Towel Rack:: To hang towels on, just a mini one, nothing major.

:: Baskets:: These are GREAT for organizing things in the bathroom!

:: Soap Dispensers:: Maybe just one or two.

Kitchen Items

:: Silverware:: Regular things, forks, spoons, knives, you know.

:: Dishware:: Again, just the regular, bowls and plates.

:: Measuring Spoons/Cups:: Just a couple sets of these, and stainless steel!

:: Cooking Utensils:: This includes wooden spoons, spatulas, dipping spoon, etc

:: Rags/Oven Mitts/Pot Holders:: I am planning on making these myself, and I really want a red and apple-themed kitchen!

:: Aprons/Table Cloths/Cloth Napkins/Place Setters/Table Runner:: I already have plans to make some of these next week! Again, I’m not really looking to buy these items or make them expensive.

How Does this Tie into “Natural Living?”

Natural living is about living self-sufficiently and friendly for the environment and our bodies. Since most of these items I will be making and/or will aid the process of living naturally (for example, cooking homemade meals or making my own deodorant), I will be either living naturally and/or preparing to live naturally. It’s a win-win situation! How exciting!!

Am I Missing Anything?

If I am missing items that you would deem “essential”, I would LOVE if you would tell me! Or, if you have other items that you have included (like baby items), let me know what they are in the comments section!

NEXT: Part 3: “What Does Having a Hope Chest Mean $$-Wise?

Homemade Deodorant Recipe #1: SUCCESS!

24 May

This is my recipe with my ingredients and measurement spoons.

 A success! Not a flop! Whooorah! I’m excited! I’m happy! I’m flabbergasted that my homemade deodorant recipe TURNED OUT the way it was supposed to! Yayayayayay! MUCH different than my first homemade toothpaste recipe, which ended up NOT turning out well at all. Now, only time will tell if the deodorant WORKS well. (I am wearing it right now, and it is just fine.) I will update the blog after some time of using the deodorant.

Why did I chose to make my own deodorant? I actually have many reasons, but the main two are 1. Commercial deodorants have aluminum in them, as well as other ingredients that have been linked to cancer and many other diseases. No… I much rather prefer to go natural. and 2. Commercial deodorants can be EXPENSIVE. My normal deodorant cost more than $3.00, whereas this homemade deodorant cost me less than $1.00! I much rather prefer to be frugal.

Here’s how to make your own homemade deodorant!

1. Baking Soda/Cornstarch

Mix 1/4 of each into a bowl or container.

Adding my 1/4 of cornstarch to my 1/4 of baking soda (without aluminum).

Baking Soda and Cornstarch can be IRRITATING to some people’s skin, so you do NOT want to make a large batch your first time, as you determine the correct measurements for your skin. You can reduce your ratio of baking soda/cornstarch to coconut oil, if you find it does bother your skin. Also, an alternative to Cornstarch is Arrowroot powder (of the same measurement). The Cornstarch or Arrowroot powder act as thickening agents for your deodorant, so they are pretty essential to this recipe.

2. Add Coconut Oil

Spoon 6-8 Tablespoons of SOLID coconut oil into your bowl or container of baking soda and cornstarch. You may have to use more, if your deodorant turns out not as solid.

Here I am adding my pure, all natural coconut oil to my mix of baking soda and cornstarch.

Remember that coconut oil stays solid at 76 degrees and below. At 77 degrees or higher, it turns to liquid. If you live in a particularly warm climate, you may consider putting your finished deodorant and coconut oil in the refrigerator to prevent from melting.

3. Add Essential Oils (Optional)

I did not do this, since I am currently still in the market for essential oils, but if you have essential oils on hand, you can add them for scent or flavor, if you like. I do not know much about each essential oils’ qualities; however, I have heard that peppermint, orange, and tea tree oil are all popular choices. You can mix and match to get the scent you desire.

If you do not add essential oils, the deodorant will not really “smell” like anything. (At least mine does not.) I have heard that the coconut oil can be fragrant in itself, depending on the type you use, but mine did not smell like anything in particular.

4. Mash the combination with a spoon

The next step is to simply mash it all together with a spoon until it becomes thick like a commercial deodorant. This may take a couple of minutes, but keep on going, and it’ll get there! 🙂

I had just begun mashing up all my ingredients, and I admit...I was doubtful at first that it would turn out.

5. Place in a Container

You can either place your deodorant in a jar, or you can place it in a used deodorant container. I chose to do the latter. You just need to mush it down. This recipe makes about 1 cup, or about 1 deodorant stick. By the way, if you put it in a used deodorant container, it looks JUST LIKE the store bought kind! 😀

Doesn't it look like the real thing? Even my skeptical sisters were amazed!

What I Did Next:

Since I had been touching it with my 98.6 degree hands, it started getting a little liquid-y, so I just put it into the refrigerator. When I went to take a shower this morning, I took the deodorant out of the fridge, put it on the counter, allowed the heat from the shower to soften it up a bit. Then, I put on the deodorant, and I am wearing, and have been wearing it since this morning, and I am doing very well with it. I have not experienced any rashes or irritation from it. I hope I never do!

CREDIT:

I received my deodorant recipe from Lindsey at Passionate Homemaking. You can see her instructions, her video tutorial, and her FAQ on the topic of homemade deodorant making. I found her article EXTREMELY helpful and informative. You may, too, so Click here!

DISCLAIMER:

You try this deodorant recipe at your own risk. Everyone’s bodies are DIFFERENT, so what works for me is not guaranteed to work for you. Research before you begin ANY project. For example, I did A LOT of research into homemade deodorant recipes before I made my own (almost a month’s worth). If you experience problems, I am neither a doctor nor an expert on hygiene and body care, but I will be available to hear your complaints and help you find a solution.

Homemade Toothpaste Recipe #1: FAIL

23 May

Yes…my pretty little marker board with my pretty little smile out of my pretty little “oo,” and the toothpaste was a FLOP! 😦

Despite it’s ultimate FAIL, I learned from this “mad scientist” experiment, a my mother calls it. Here is the GOOD, the BAD and the YUCKY:

The GOOD–

If you can tell, the consistency began very solid. Then, it became soupy!

Okay, I was kidding. There really wasn’t anything good about it at all. It was kind of cool to see how all of the ingredients started out solid-y, and then turned to eventual soup (which it was not supposed to do), but…yea, that wasn’t exactly “good.”

On a good note, the baking soda, peppermint extract, and coconut oil did do a good enough job brushing my teeth. My mouth felt clean when I rinsed with cold water, just not “fresh,” like the mint would give it.

The BAD–

Well, I kind of just told you that, didn’t I? haha 🙂 The bad of it was that I used nearly HALF a bottle of $3.48 peppermint extract on trying twice to get the toothpaste to turn out right and yummy…which ultimately didn’t work. I gave the rest to my mom to use for cooking, since she’s the cook in the household. The Bad was also that I brushed my teeth multiple times with the failed homemade toothpaste, in order to test at different consistencies, measures, and recipe remixes. Nasty!

And, finally, the YUCKY–

I did determine that the peppermint EXTRACT was the main cause of it being so downright yucky (and also soupy). I will try again with peppermint OIL. Baking Soda does not taste exceptionally good, but adding alcohol (in the extract) is absolutely TEN TIMES worse! Don’t do it.

Here was my ingredient list:

Coconut Oil, Arm & Hammer Baking Soda, and Peppermint Extract. Consider the Extract a "bye-bye."

I was disappointed…

because I had all my items set out on the counter, and I had read and researched tons of recipes for homemade toothpaste, and I was PREPARED and EXCITED to go natural on this dental hygiene product.

I am NOT deterred…

because I know what was wrong with my recipe (stinkin’ peppermint extract), and I have read the different testimonies of people who have made their own toothpaste and it turned out well. Their pictures even turned out great, like these from Tammy’s Recipes. I am encouraged in my failure, and I am further inspired to pursue my natural lifestyle.

So…the search and the journey continues on.

Do you have any homemade toothpaste bloopers or tips to share? I would love to learn from your experience!